Celebrate Christmas with a charming handmade Tea Set created entirely In The Hoop.
MATERIALS REQUIRED
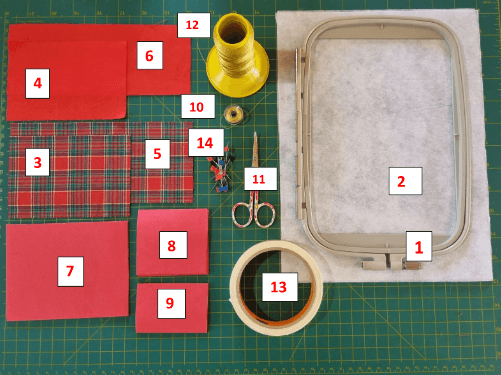
TEA BAG HOLDER SLED
Note: Use 2 mm or 3 mm craft foam (EVA foam) in a color that most closely matches your fabric or the thread selected for the satin stitch finishing. In this sample, red EVA foam was used.
Materials Required
1 - 5 × 7 in (13 × 18 cm) embroidery hoop
2 - Tear-away stabilizer
3 - 2 pieces of plaid quilting cotton fabric — 15 × 9 cm (5.91 × 3.54 in) (Sled)
4 - 2 pieces of solid quilting cotton fabric — 15 × 9 cm (5.91 × 3.54 in) (Back of Sled)
5 - 1 piece of plaid quilting cotton fabric — 20 × 8 cm (7.87 × 3.15 in) (Box)
6 - 1 piece of solid quilting cotton fabric — 20 × 8 cm (7.87 × 3.15 in) (Box Back)
7 - 2 pieces of 2 mm or 3 mm EVA foam — 15 × 11 cm (5.91 × 4.33 in) (Sled)
8 - 2 pieces of 2 mm or 3 mm EVA foam — 7.5 × 7 cm (2.95 × 2.76 in) (Box)
9 - 1 piece of 2 mm or 3 mm EVA foam — 7.5 × 5.2 cm (2.95 × 2.05 in) (Box)
10 - Bobbin wound with the thread color selected for the satin stitch finishing
11 - Fine-point scissors for trimming
12 - Embroidery thread
13 - Masking tape
14 - Fine pins
15 - Seam ripper
16 - Four 25 cm (9.84 in) pieces of No. 1 satin ribbon (Sled)
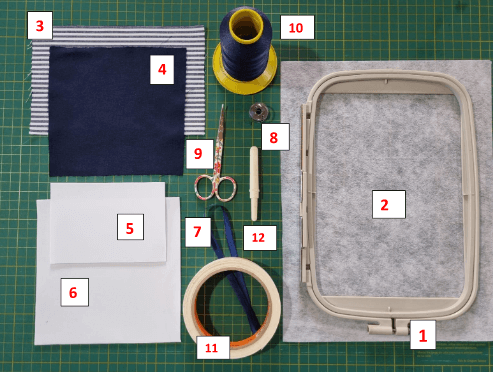
BREAD & COOKIE BASKET
Note: Use 2 mm or 3 mm EVA foam (craft foam) in a color that most closely matches your fabric or the thread selected for the satin stitch finishing. In this sample, white EVA foam was used. If you choose a darker fabric, you can color the exposed edges of the EVA foam with a fabric marker for a cleaner, more professional finish.
Materials Required
1 - 5 × 7 in (13 × 18 cm) embroidery hoop
2 - Tear-away stabilizer
3 - 6 pieces of printed quilting cotton fabric — 19 × 12 cm (7.48 × 4.72 in) (Basket Sides)
4 - 2 pieces of solid quilting cotton fabric — 15 × 15 cm (5.91 × 5.91 in) (Basket Base)
5 - 6 pieces of 2 mm or 3 mm EVA foam — 12 × 8.5 cm (4.72 × 3.35 in) (Basket Sides)
6 - 1 piece of 2 mm or 3 mm EVA foam — 15 × 15 cm (5.91 × 5.91 in) (Basket Base)
7 - 6 pieces of No. 1 satin ribbon, 30 cm (11.81 in) each
8 - Bobbin wound with the thread color selected for the satin stitch finishing
9 - Fine-point scissors for trimming
10 - Embroidery thread
11 - Masking tape
12 - Seam ripper
MUG RUG
Note: Use 2 mm or 3 mm EVA foam (craft foam) in a color that most closely matches your fabric or the thread selected for the satin stitch finishing. In this sample, white EVA foam was used. If you choose a darker fabric, you can color the exposed edges of the EVA foam with a fabric marker for a cleaner, more professional finish.
Materials Required
1 - 5 × 7 in (13 × 18 cm) embroidery hoop
2 - Tear-away stabilizer
3 - 1 piece of printed quilting cotton fabric — 15 × 15 cm (5.91 × 5.91 in)
4 - 1 piece of solid quilting cotton fabric — 15 × 15 cm (5.91 × 5.91 in)
5 - 1 piece of solid quilting cotton fabric — 11 × 11 cm (4.33 × 4.33 in)
6 - 1 piece of 2 mm or 3 mm EVA foam — 15 × 15 cm (5.91 × 5.91 in)
7 - Bobbin wound with the thread color selected for the satin stitch finishing
8 - Fine-point scissors for trimming
9 - Embroidery thread
10 - Masking tape
TEA BAG HOLDER SLED – STITCHING INSTRUCTIONS STAGE 01
STEP 01
Load the Tea Bag Holder Sled design into the embroidery machine.
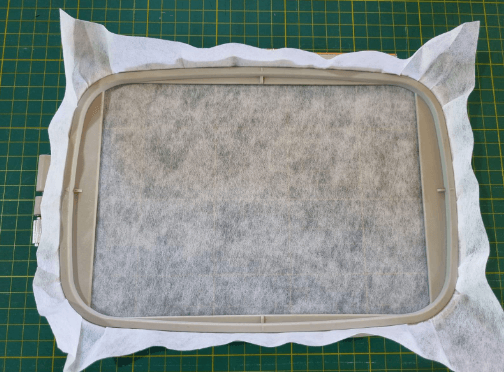
Hoop the tear-away stabilizer.
STEP 02
Return the hoop to the embroidery machine.
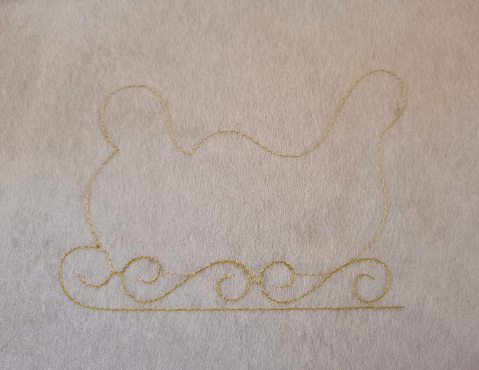
Stitch the first color, which will create the placement line.
STEP 03
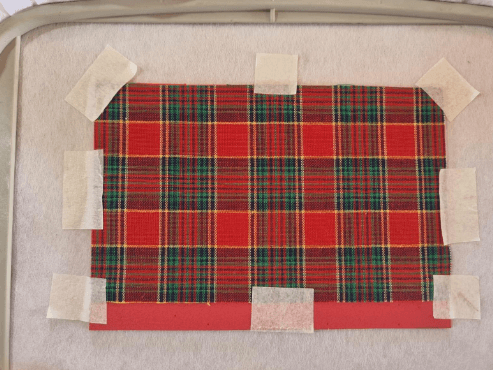
Place the 15 × 11 cm (5.91 × 4.33 in) EVA foam on the placement line.
Position the plaid quilting cotton fabric measuring 15 × 9 cm (5.91 × 3.54 in) over the EVA foam, aligning it with the top edge of the foam.
Secure the materials with masking tape.
STEP 04
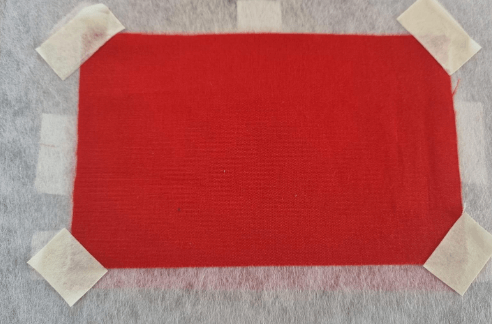
On the back of the hoop, place the solid quilting cotton fabric measuring 15 × 9 cm (5.91 × 3.54 in).
Align it with the top edge of the EVA foam.
Secure it with masking tape.
STEP 05
Return the hoop to the embroidery machine.
Stitch the next color, which will secure both layers in place (tack-down stitch).
Trim away the excess fabric from both the front and back of the project.
Do not remove the EVA foam.
STEP 06
Replace the bobbin thread with the thread color selected for the satin stitch finishing.
STEP 07
Return the hoop to the embroidery machine.
Stitch the satin stitch finishing.
STEP 08
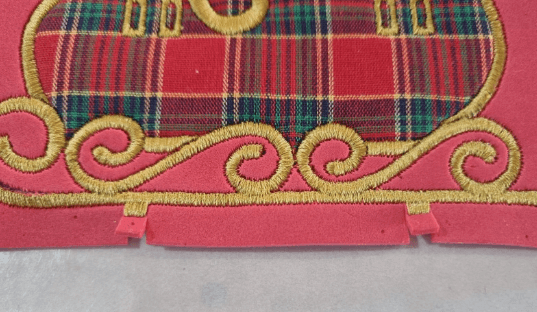
Using fine-point scissors, make two vertical cuts in the EVA foam alongside the satin stitch, as shown in the photo below.
These small loops will connect the sled to the box.
Take care not to cut the embroidery stitches.
STEP 09
Remove the excess EVA foam, leaving only the loops intact.
Repeat all the steps in this stage one more time to make the second sled piece.
Before stitching the second sled piece, mirror the design on your embroidery machine.
TEA BAG HOLDER SLED – STITCHING INSTRUCTIONS STAGE 02
STEP 01
You should now have both sled side panels completed.
Set them aside for assembly in the following steps.
STEP 02
Load the Tea Bag Holder Box design into the embroidery machine.
Hoop the tear-away stabilizer.
STEP 03
Return the hoop to the embroidery machine.
Stitch the first color, which will create the placement line.
STEP 04
On the back of the hoop, place the solid quilting cotton fabric measuring 20 × 8 cm (7.87 × 3.15 in).
Secure it along the edges with masking tape.
STEP 05
On the front of the hoop, place the EVA foam pieces over each marked square, matching the sizes below and aligning them flush with the stitching lines, as shown in the photos.
7.5 × 7 cm (2.95 × 2.76 in)
7.5 × 5.2 cm (2.95 × 2.05 in)
7.5 × 7 cm (2.95 × 2.76 in)
Secure each piece with masking tape.
Be sure to use each EVA foam piece in its correct position and size to ensure proper assembly of the project.
STEP 06
After positioning the EVA foam pieces, place the plaid quilting cotton fabric measuring 20 × 8 cm (7.87 × 3.15 in) over them.
Secure the fabric with masking tape.
STEP 07
Return the hoop to the embroidery machine.
Stitch the next color, which will secure both the front and back layers in place (tack-down stitch).
After the fabrics have been secured, remove the masking tape and trim away the excess fabric from both the front and back of the project.
Do not remove the EVA foam.
Do not remove the project from the hoop.
TEA BAG HOLDER SLED – STITCHING INSTRUCTIONS ASSEMBLY STAGE
STEP 01
We will now assemble the pieces completed in Stage 01.
Position one sled side panel over the tea bag holder box, which should still be hooped.
Place the right side of the fabric facing outward.
Align the two loops with the center stitching lines of the box, positioning them approximately 2 mm (0.08 in) below the horizontal stitching line.
STEP 02
Secure the loops with masking tape.
Using fine pins, secure the sled side panel as close to the hoop frame as possible.
This will prevent the presser foot from catching the piece and shifting it during embroidery.
STEP 03
For added security, you may also use masking tape to secure the decorative details of the sled, as shown in the photo below.
STEP 04
Make sure the presser foot is raised slightly higher than usual and reduce the embroidery speed.
Return the hoop to the embroidery machine.
Stitch the next color, which will secure the assembled pieces in place.
It is important to closely monitor the stitching process during this step.
STEP 05
Remove the hoop from the embroidery machine.
Replace the bobbin thread with the thread color selected for the satin stitch finishing.
STEP 06
Do not remove the pins.
Return the hoop to the embroidery machine.
Stitch the satin stitch finishing.
Closely monitor the embroidery process while the finishing stitches are being sewn.
Once the embroidery is complete, remove the masking tape and the pins.
STEP 07
Remove the project from the hoop.
Tear away the tear-away stabilizer and remove the EVA foam.
Clean up the embroidery by trimming any loose threads.
Using a seam ripper, carefully open the slits, taking care not to extend beyond the embroidery stitches.
STEP 08
Thread the No. 1 satin ribbons through the openings, as shown in the photos.
DONE!
YOUR TEA BAG HOLDER SLED IS COMPLETE!
MUG RUG – STITCHING INSTRUCTIONS
STEP 01
Hoop the tear-away stabilizer.
STEP 02
Return the hoop to the embroidery machine.
Stitch the first color, which will create the placement line.
STEP 03
On the back of the hoop, place the solid quilting cotton fabric measuring 15 × 15 cm (5.91 × 5.91 in).
Secure it with masking tape.
STEP 04
On the front of the hoop, place the 15 × 15 cm (5.91 × 5.91 in) EVA foam over the placement line.
Then place the printed quilting cotton fabric measuring 15 × 15 cm (5.91 × 5.91 in) over the EVA foam.
Secure the materials with masking tape.
STEP 05
Return the hoop to the embroidery machine.
Stitch the next color, which will secure the front and back layers in place (tack-down stitch).
Once the fabrics have been secured, remove the masking tape.
STEP 06
Trim away the excess fabric around the outer placement line and around the inside of the half-moon opening, on both the front and back of the project.
Do not trim the EVA foam.
STEP 07
On the front of the hoop, place the solid quilting cotton fabric measuring 11 × 11 cm (4.33 × 4.33 in) over the placement area.
Secure it with masking tape.
STEP 08
Return the hoop to the embroidery machine.
Stitch the next color, which will secure the fabric in place (tack-down stitch).
Once the fabric has been secured, remove the masking tape and trim away the excess fabric.
Do not remove the EVA foam.
STEP 09
Replace the bobbin thread with the thread color selected for the satin stitch finishing.
STEP 10
Return the hoop to the embroidery machine.
Stitch the final color sequence, completing the satin stitch finishing.
Remove the project from the hoop.
Tear away the tear-away stabilizer and remove the EVA foam.
Clean up the embroidery by trimming any loose threads.
Load the Basket Side Panel design (Double Side Panel Design) into the embroidery machine.
Hoop the tear-away stabilizer.
STEP 02
Return the hoop to the embroidery machine.
Stitch the first color, which will create the placement lines for the two side panels.
STEP 03
On the back of the hoop, place the printed quilting cotton fabric measuring 19 × 12 cm (7.48 × 4.72 in).
Secure it with masking tape.
STEP 04
On the front of the hoop, place the two EVA foam pieces measuring 12 × 8.5 cm (4.72 × 3.35 in) over the placement lines.
Align each piece flush with the first stitching line, as shown in Photos 1 and 2.
Secure the EVA foam pieces with masking tape along the edges.
STEP 05
On the front of the hoop, place the printed quilting cotton fabric measuring 19 × 12 cm (7.48 × 4.72 in) over the EVA foam pieces.
Secure it with masking tape.
STEP 06
Return the hoop to the embroidery machine.
Stitch the next color, which will secure the fabric in place (tack-down stitch).
Once the fabric has been secured, remove the masking tape.
STEP 07
Trim away the excess fabric from both the front and back of the project.
STEP 08
Secure both EVA foam pieces with masking tape.
This will prevent the presser foot from catching the EVA foam and shifting the project during embroidery.
STEP 09
Replace the bobbin thread with the thread color selected for the satin stitch finishing.
STEP 10
Return the hoop to the embroidery machine.
Stitch the satin stitch finishing.
Once the embroidery is complete, remove the masking tape.
STEP 11
Remove the EVA foam.
STEP 12
Trim any jump threads.
Remove the project from the hoop.
Tear away the tear-away stabilizer.
STEP 13
Using a seam ripper, carefully open the slits.
STEP 14
You should now have two completed basket side panels.
Repeat all the steps in this stage two more times to make a total of six side panels.
Set them aside for assembly.
Load the Basket Base design into the embroidery machine.
Hoop the tear-away stabilizer.
STEP 02
Return the hoop to the embroidery machine.
Stitch the first color, which will create the placement line.
STEP 03
On the back of the hoop, place the solid quilting cotton fabric measuring 15 × 15 cm (5.91 × 5.91 in) (Basket Base).
Secure it along the edges with masking tape.
STEP 04
Return the hoop to the embroidery machine.
Stitch the next color, which will secure the fabric in place (tack-down stitch).
STEP 05
Remove the hoop from the embroidery machine.
Remove the masking tape.
Trim away the excess fabric.
STEP 06 – BASKET ASSEMBLY
On the front of the hoop, position each basket side panel with the right side of the fabric facing up.
Place each panel one at a time, following the placement lines as shown in Photos 1, 2, and 3.
Secure each panel with masking tape.
STEP 07
Apply additional masking tape to hold the basket side panels firmly in place.
This will prevent the presser foot from catching the panels and shifting them during embroidery.
STEP 08
Make sure the presser foot is raised slightly higher than usual and reduce the embroidery speed.
Return the hoop to the embroidery machine.
Stitch the next color, which will secure the assembled side panels in place.
Once the stitching is complete, remove only the center pieces of masking tape.
STEP 09
On the front of the hoop, place the 15 × 15 cm (5.91 × 5.91 in) EVA foam over the basket base.
Then place the solid quilting cotton fabric measuring 15 × 15 cm (5.91 × 5.91 in) over the EVA foam.
Secure both layers with masking tape.
STEP 10
Return the hoop to the embroidery machine.
Stitch the next color, which will secure the materials in place (tack-down stitch).
Once the fabrics have been secured, remove the masking tape.
Trim away the excess fabric only.
Do not remove the EVA foam.
STEP 11
Replace the bobbin thread with the thread color selected for the satin stitch finishing.
STEP 12
Return the hoop to the embroidery machine.
Stitch the final color sequence, completing the satin stitch finishing.
STEP 13
Remove the project from the embroidery machine and take it out of the hoop.
Tear away the EVA foam and the tear-away stabilizer.
Clean up the embroidery by trimming any loose threads.
Thread the No. 1 satin ribbons through the slits, joining the basket side panels together.
Tie the ribbons into small bows to complete the basket.