Wishlist

Dogs and Cats Keychains (In The Hoop)

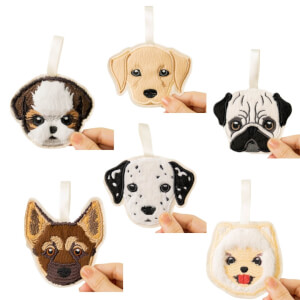
Who doesn't love a puppy, right!?

With that in mind, we decided to create a few keychain embroidery designs featuring different dog breeds as an experiment.

If you like them, we?ll make designs for other breeds too.
These keychain embroidery files are programmed with steps for backing the embroidery and also for sewing the little loop.

In this project, you will learn step-by-step how to embroider these adorable puppy keychains using your computerized embroidery machine.

The keychains we made were produced in a medium size, but we provide the downloadable files in up to five different sizes, so you can make them smaller or even larger than the ones shown.

STEP BY STEP

MATERIALS USED

1 - a piece of plush fabric or similar, 13x13 cm
2 - a piece of felt the size of your hoop
3 - a sheet of water-soluble stabilizer the size of the hoop (it must be at least 90 microns thick, as it will replace the use of regular stabilizer on the back of the embroidery — if it's too thin, it won't properly stabilize the material)
4 - masking tape
5 - colorful polyester embroidery threads
6 - bobbins with colors matching the outlines
7 - a piece of colored felt, 13x13 cm, for the backing
8 - scissors
9 - a 13x13 cm piece of water-soluble stabilizer to embroider over the plush fabric (this one can be thinner)
10 - 12 cm of 1 cm wide satin ribbon

Step 01

Prepare the hoop with the felt and the water-soluble stabilizer behind it.


Step 02

Embroider the first color of the design.


Step 03

Fold the satin ribbon in half.

Using masking tape, place it on the marking made by the machine.

Stitch the next color (this will sew the satin ribbon in place)

Step 04

Place the piece of plush fabric over the entire stitched area of the design.


Step 05

Place the piece of water-soluble stabilizer on top of the plush fabric.


Step 06

Embroider the next color.


Step 07

Trim the excess water-soluble stabilizer outside the stitching.

Trim the excess plush fabric outside the stitching.


Step 08

Embroider the next colors that will create the embroidery's finishing details.


Step 09

The machine will sew around the entire design, indicating the moment to insert the backing fabric.


Step 10

Remove the hoop from the machine.

Turn it over to the back side.


Step 11

Place the piece of colored felt that will serve as the backing of the keychain.

Secure it with masking tape.


Step 12

Stitch the next color.

Remove the masking tape from the back.


Step 13

Trim the excess felt outside the stitching.


Step 14

Continue embroidering the next colors, changing the bobbin thread to match the top thread colors.


Step 15

Cut out the keychain, following the stitching as a guide.


Step 16

Rinse the embroidery under running water to completely remove any remaining water-soluble stabilizer.

Let it dry in the shade for at least 24 hours.


Front

Finishing of the front side of the keychain.


Back

Finishing of the back side of the keychain.